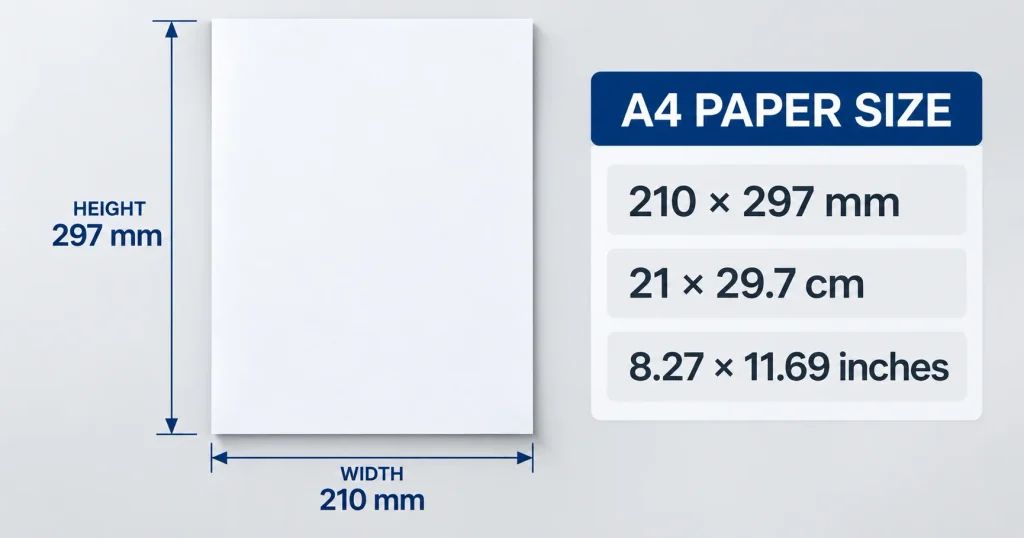
A4 is the everyday paper size used across the UK for letters, invoices, reports, artwork drafts and print proofs. Its finished size is 210 × 297 mm, or 21 × 29.7 cm. In inches, that is approximately 8.27 × 11.69 inches.
Those dimensions are fixed. What changes is how A4 is prepared for different jobs. A digital design needs the right pixel dimensions. Commercial printing may need bleed. Packaging artwork may use an A4 sheet for an early mock-up, but the final dieline should always follow the dimensions of the actual box.
Direct answer: A4 paper measures 210 × 297 mm. At 300 DPI, an A4 raster image is approximately 2480 × 3508 pixels. If 3 mm bleed is added on every edge, the artwork size becomes 216 × 303 mm.
What Size Is A4 Paper in the UK?
In the UK, standard A4 paper size is:
210 mm × 297 mm
21 cm × 29.7 cm
8.27 in × 11.69 in
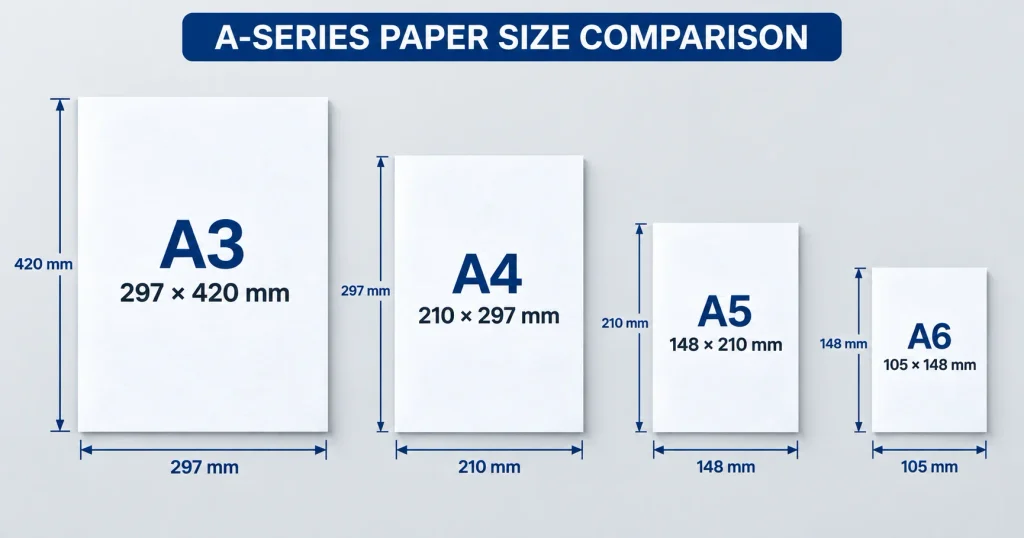
The UK uses the ISO A-series system, so A4 sits between A3 and A5.
Turn the sheet sideways and the measurements simply reverse:
Portrait: 210 × 297 mm
Landscape: 297 × 210 mm
The sheet itself has not changed size.
Pro Tip: For professional artwork, work in millimetres whenever possible. It avoids unnecessary rounding when dimensions, bleed and dielines are being checked.
Why Has A4 Become the Standard Everyday Size?
A4 works well because the A-series follows a consistent proportion.
Fold an A3 sheet in half and you get two A4 areas. Fold A4 in half and you get two A5 areas.
That relationship is useful in printing because artwork can be enlarged or reduced between A-series formats without completely changing its proportions.
It is one reason A4 appears across:
- office documents;
- brochures;
- instruction sheets;
- forms;
- product information;
- proofs;
- artwork drafts; and
- early packaging concepts.
For packaging, though, A4 should be treated as a convenient working sheet rather than a standard box size.
A4 Measurements by Unit and Resolution
A4 Size in Millimetres
The exact A4 size in mm is:
210 × 297 mm
This is usually the most useful measurement for UK print and packaging work.
You may occasionally see A4 described as 210 × 300 mm. That is only a rounded approximation and should not be used when setting up final artwork.
Three millimetres may sound insignificant, but in printing it can affect alignment, margins and bleed.
Direct answer: Use 210 × 297 mm whenever the file is being prepared for actual print production.
A4 Size in Centimetres
The A4 size in cm is:
21 × 29.7 cm
For rough measurements, some people round the height to 30 cm, but the official size remains 29.7 cm.
This distinction is particularly useful when you are checking whether a printed insert, leaflet or simple paper mock-up will physically fit inside another piece of packaging.
A4 Size in Inches
A4 measures approximately:
8.27 × 11.69 inches
The conversion is useful when artwork arrives from a supplier or designer working in imperial measurements.
A4 should not be confused with the common American 8.5 × 11 inch Letter format. They are close enough to look similar on screen, but different enough to create print problems.
A4 Size in Pixels at Different Resolutions
There is no single correct answer to “What is A4 size in pixels?”
The physical sheet stays the same. The number of pixels changes with the resolution.
Common A4 pixel dimensions are:
| Resolution | A4 pixel dimensions (portrait) | Common use |
| 72 DPI | Approximately 595 × 842 px | Basic screen preview |
| 96 DPI | Approximately 794 × 1123 px | General digital use |
| 150 DPI | Approximately 1240 × 1754 px | Medium-resolution output |
| 300 DPI | Approximately 2480 × 3508 px | High-quality commercial print |
For high-quality raster artwork intended for commercial print, 300 DPI at the final printed size is a common specification.
But there is an important distinction.
A vector logo or packaging dieline does not become sharper because you increase its DPI. Vector artwork is mathematically scalable. Resolution mainly matters for photographs and other raster images.
Pro Tip: Do not enlarge a small 72 DPI image and simply change the file setting to 300 DPI. That increases the number written in the file settings, not the original image detail.
Is A4 the Same Size in Portrait and Landscape?
Yes.
Only the orientation changes.
Portrait A4 is:
210 mm wide × 297 mm high
Landscape A4 is:
297 mm wide × 210 mm high
This matters when printing packaging tests because a narrow carton sleeve may fit one orientation better than another.
Always check the actual dieline dimensions before rotating or moving artwork.
How A4 Compares With Other Paper Standards
A4 vs A3, A5 and Other A-Series Sizes
The most commonly encountered A-series dimensions are:
| Paper size | Dimensions |
| A0 | 841 × 1189 mm |
| A1 | 594 × 841 mm |
| A2 | 420 × 594 mm |
| A3 | 297 × 420 mm |
| A4 | 210 × 297 mm |
| A5 | 148 × 210 mm |
| A6 | 105 × 148 mm |
A3 has twice the area of A4.
A5 has half the area of A4.
For packaging designers, that relationship becomes useful when a dieline is too large for a desktop A4 printer. Moving to A3 may provide enough working area without reducing the scale of the design.
Pro Tip: If you are checking whether a box template physically fits, moving to a larger sheet is usually better than shrinking the dieline.
A4 vs US Letter: What Is the Difference?
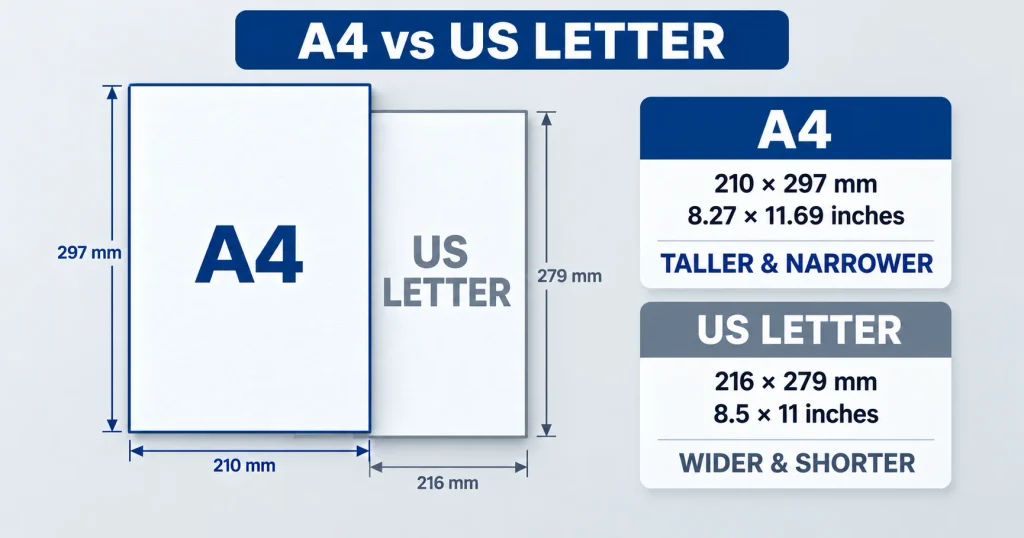
A4 and US Letter are different standards.
A4: 210 × 297 mm
US Letter: approximately 216 × 279 mm
Letter is slightly wider but shorter.
That difference can affect:
- page breaks;
- margins;
- artwork positioning;
- trim areas;
- print scaling; and
- packaging templates.
A file designed on US Letter can appear fine on screen but may be automatically resized when printed on A4.
Direct answer: No, A4 is not the same as 8.5 × 11 inches.
If artwork has been created outside the UK, always confirm the intended page size before printing.
Preparing A4 Artwork and Packaging Tests
What Is A4 Size With 3 mm Bleed?
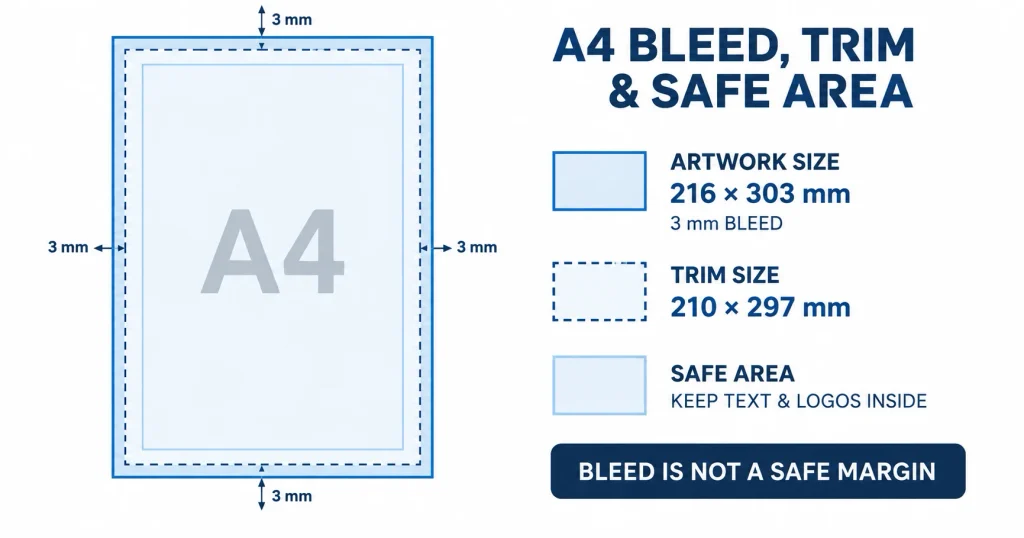
An A4 page has a finished trim size of:
210 × 297 mm
Add 3 mm bleed on all four sides and the artwork becomes:
216 × 303 mm
Why?
You add:
3 mm left + 3 mm right = 6 mm
3 mm top + 3 mm bottom = 6 mm
So:
210 + 6 = 216 mm
297 + 6 = 303 mm
Bleed gives the printer artwork beyond the final cut edge, reducing the risk of thin white lines showing after trimming.
Pro Tip: Bleed is not a safe margin. Bleed sits outside the trim line; logos and important text should stay comfortably inside it.
For packaging artwork, always follow the bleed specification supplied with the actual dieline.
How to Set Up A4 Artwork for Professional Printing
Correct dimensions are only the starting point.
Before sending an A4 design for commercial print, check:
- document size;
- bleed;
- colour mode;
- image resolution;
- fonts;
- safe margins; and
- final export settings.
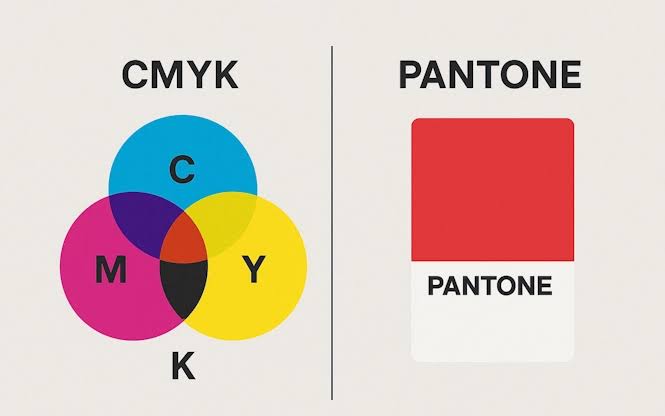
CMYK is commonly used for full-colour printing. Pantone colours may be specified where consistent brand colour is especially important. Read the Pantone vs CMYK guide to understand which colour system is more suitable for a particular print job.
Raster images should also be checked at their final printed size, not simply at whatever resolution the source file happens to contain.
For packaging work, use the supplier’s approved template rather than creating a box layout from a blank A4 document.
Hi Custom Boxes provides guidance onpreparing print-ready packaging artwork where specifications such as bleed, image quality and proofing need to be confirmed before production.
Can You Print a Packaging Dieline on A4?
Sometimes.
The real question is whether the flattened dieline fits inside the printable A4 area at 100% scale.
Small structures may fit comfortably, including:
- simple folding cartons;
- narrow sleeves;
- small inserts;
- labels;
- header-style cards; and
- compact box prototypes.
Large structures often will not.
Mailer boxes, deep cartons and packaging with large locking flaps can occupy far more space when laid flat than they do once assembled.
Direct answer: A4 can be used for a packaging dieline only when the complete template fits at the correct scale.
Never reduce a production dieline just to fit your home printer and then assume the resulting box represents the final dimensions. You can also review the available packaging templates before preparing a structural test.
How Can A4 Be Used for Packaging Mock-Ups?
One of the best packaging uses for A4 is a quick paper prototype.
Print the dieline, cut it out and fold it to check whether the structure makes sense.
A basic prototype can reveal:
- upside-down artwork;
- incorrect panel order;
- poor logo placement;
- text crossing a fold;
- awkward opening direction;
- incorrect proportions; and
- overlooked artwork areas.
This can save time before the design moves further into production.
However, an office-paper prototype has limits.
Standard paper does not reproduce the stiffness, crease behaviour, surface or strength of carton board.
Pro Tip: Use an A4 mock-up to judge layout and scale, not final packaging strength.
When a project needs a production-ready dieline, mock-up or artwork refinement,packaging design support can help bridge the gap between an early paper concept and a manufacturable box.
When Is A4 Too Small for a Box Template?
A4 becomes impractical when the flattened structure extends beyond 210 × 297 mm.
This often happens with:
- mailer boxes;
- larger folding cartons;
- subscription boxes;
- product gift sets;
- wide sleeves;
- larger inserts; and
- packaging with substantial side panels or flaps.
A box that looks compact when assembled may require a surprisingly large sheet once unfolded.
For example,custom mailer box structures include walls, flaps and locking sections that extend well beyond the visible front panel.
In these cases, use a larger print sheet or professional proof rather than scaling the template down.
What Does GSM Mean for A4 Paper?
GSM stands for grams per square metre.
It describes paper weight, not paper dimensions.
An 80 gsm A4 sheet and a heavier A4 sheet are both still 210 × 297 mm.
The difference is how substantial they feel and how they behave when folded.
For early mock-ups, heavier paper can make folds easier to judge than ordinary copier paper.
But even heavier paper should not be mistaken for actual packaging board.
A production carton has different stiffness, grain, coating and crease characteristics.
Once the project moves beyond a simple prototype, material should be selected according to the product, box structure and required performance. The cardboard material guide explains how paperboard, corrugated board, kraft board and rigid greyboard differ in real packaging applications.
Seven A4 Print Mistakes That Cause Problems
A4 itself is simple. Most errors come from file setup.
- Using US Letter by accident
The artwork may scale or crop unexpectedly.
- Rounding A4 to 210 × 300 mm
Useful for conversation, not for final artwork.
- Forgetting bleed
Full-bleed designs need artwork extending beyond the trim line.
- Assuming A4 always equals 2480 × 3508 pixels
That figure only applies at around 300 DPI.
- Printing a dieline with “Fit to Page” enabled
The printer may change the box dimensions.
- Using low-resolution product images
Correct document size cannot repair poor source imagery.
- Testing structure with office paper
A thin paper prototype cannot prove how production board will hold a real product.
Pro Tip: If dimensions matter, print a small measurement scale or reference line alongside your test dieline and check it with a ruler before building the mock-up.
Checklist Before Printing an A4 Packaging Test
A quick pre-print check can prevent a misleading prototype.
Make sure:
- the approved dieline is being used;
- the file is printed at 100% scale;
- automatic page fitting is disabled;
- cut and fold lines remain visible;
- artwork sits on the correct panels;
- important text clears folds and edges;
- raster images are sufficiently sharp; and
- the correct orientation is selected.
For a rough fold test, a home or office printer may be enough.
For colour approval, finishing decisions or final production sizing, use the packaging supplier’s proofing process instead.
How to Move From an A4 Test to Production Packaging
A4 is useful early in the design process because it is fast and familiar.
But a successful mock-up does not mean the packaging is production-ready.
The next decisions should be based on the product itself:
- exact product dimensions;
- board type;
- box structure;
- internal fit;
- print method;
- finishing;
- transport requirements; and
- final dieline.
The finished box should fit the product—not a standard piece of office paper.
That is the point where a simple prototype becomes a proper packaging specification.
If you need specialist help preparing a dieline, checking artwork or moving a paper prototype into production, learn how to choose a packaging designer or discuss the project through Hi Custom Boxes’ packaging design service.
Need packaging advice for your next order?
Share your box size, material, quantity, and artwork needs. Our team can guide you before production starts.